| Application interface |
|
|
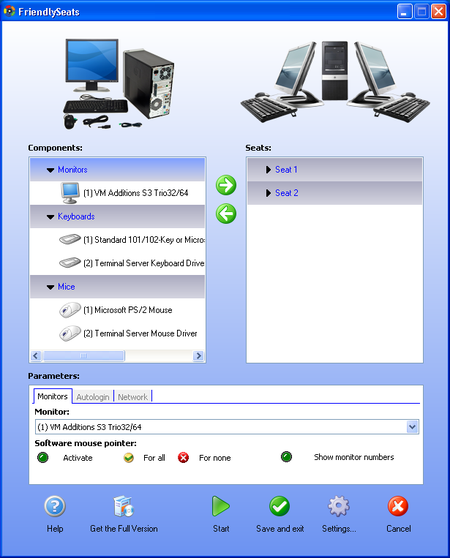
Friendly Seats has a simple interface consisting of a main window and the general settings window. Main window (see Fig. 3.1) displays a list of detected input and output devices as well as a list of seats to which they can be connected.
Fig. 3.1. Main window of the Friendly Seats application.
The main window consists of three information blocks:
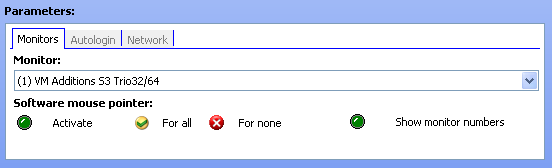
In the block "Components" a list of detected input and output devices is displayed. This "Components" will be used to create new seats. Peripherals are sorted by functional groups: monitor, keyboard and mouse. Block "Seats" displays the periphery, already connected to the seats. Peripherals are sorted by seats. Block "Parameters" contains three tabs: Monitors, Autologin, Network. "Monitors" tab (Fig. 3.2) can setup the mouse mode for each monitor. There are two modes of mouse: software and hardware (default). Enabling of software mode is recommended when there is a problem when working in hardware mode.
Fig. 3.2. "Monitors" tab of block "Parameters"
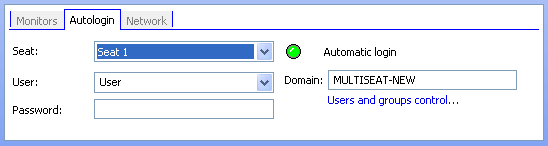
On the "Autologon" tab (Fig. 3.3) you can configure and activate automatic logon to operating system for users on each seat. Using this feature allows you to simplify the process of loading the operating system at all or a selected seats. To configure the autologin you need to specify login, password (required only when working in the domain) and domain name to be used for automatic logon at selected seat.
The administrator can open the system applet "User Accounts" by clicking on the link "Manage users...".
Fig. 3.3. "Autologon" tab of block "Parameters"
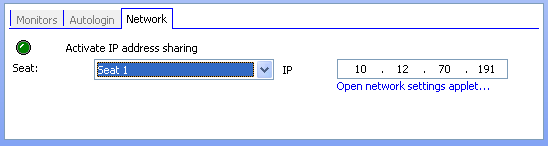
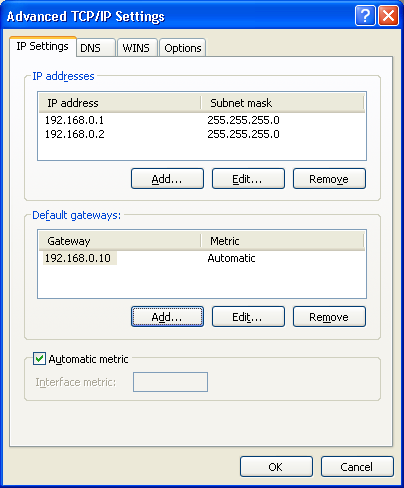
On the "Network" tab (Fig. 3.4) you can activate and configure the Network addresses separation function for every seat. To configure this function you need to specify the network address for each seat.
Fig. 3.4. "Network" tab of block "Parameters"
The administrator can open the system applet "Network Connections" by clicking the link "Open network setup dialog..."
Fig. 3.5. Network settings dialogue of the Windows XP operating system «Additional TCP/IP properties».
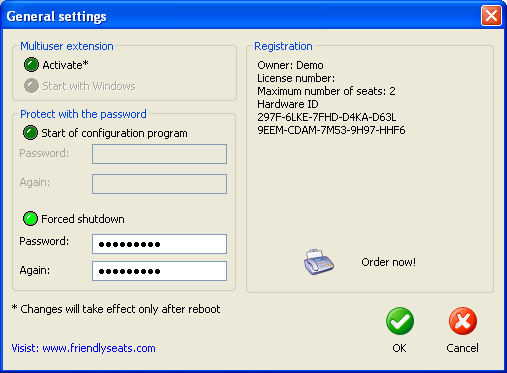
Window "General Settings" (Fig. 3.7) is opened by clicking the button "Settings..." (Fig. 3.6) in the main window. The window consists of three information units:
Fig. 3.6. The button "Settings..." opens the window "General Settings".
Block "Password protection" allows you to set a passwords for:
Password for the forced shutdown will be prompted when you try to enable administrator mode in the Winlogon dialog of Windows XP (for details, see the section "Using the program"). In the block "Multi-user extension" you can activated or deactivated multi-user extension and autostart of the seats on load of operating system.
Fig.3.7. "General Settings" window.
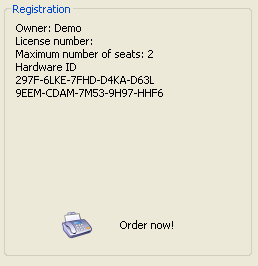
The block "Program registration" provides information about the license for the Friendly Seats program. If the program is unregistered, or in demo mode (Fig. 3.8), this block will contain hardware code that valid for current computer. You need to transfer this hardware code to seller when purchasing the program. By clicking on the button "Order Now!" you can place an order for the purchasing a program at the manufacturer's web site. The hardware code will be automatically entered into the appropriate field of the purchasing form.
Fig. 3.8. The hardware code and the button "Order Now!". |